


Everything You Need To Know About Racing Simulator Wheels and Performance
|
|
A well-set-up simulator wheel can completely change how your racing rig feels. It gives you cleaner steering control, stronger feedback through corners and a better connection with the car on screen. But the wheel itself is only one part of the setup. Mounting, software, pedals, seating position and in-game settings all affect how natural the final result feels.
At Gamer Gear Direct, our team has tested simulator wheel setups across different rigs at our Dandenong South showroom. We’ve mounted wheelbases, adjusted force feedback settings, checked pedal positioning, tested cockpit stability and helped customers solve common setup issues after purchase. This guide is based on hands-on product experience, not just manufacturer spec sheets.
Below, we’ll cover the main types of simulator wheel, what our team checks during setup, how to calibrate your system and how to solve the most common problems we see from customers.
Our team tests simulator wheel setups in real cockpit environments, not loose on a desk. That gives us a better read on wheelbase flex, seating position, pedal reach, cable placement and force feedback feel during longer sessions.
During testing, we focus on:
How securely the wheelbase mounts to the cockpit
How much movement comes through the rig under heavy steering
How smooth the force feedback feels through corners, kerbs and slides
How easy the software is to install and adjust
How quickly the simulator wheel is recognised by PC or console
How comfortable the driving position feels after a longer session
How easy it is to recalibrate pedals, shifters and handbrakes
We also look at the setup questions customers ask most often in-store. These include platform compatibility, wheel rotation, brake pressure, cockpit sizing and the difference between entry-level and direct drive setups.
If you’re choosing your first setup, start with our simulator wheel collection and work backwards from your platform, budget, cockpit space and driving style.
There are three main types of simulator wheel systems: gear-driven, belt-driven and direct drive. Each option can work well, but they suit different drivers and different budgets.
Gear-driven systems are usually the most affordable. They can be a good starting point for new drivers, especially if you’re building your first rig and want to learn the basics before spending more. The trade-off is feel. In our testing, gear-driven wheels can feel more mechanical through the hands, especially during quick corrections or sharp force feedback changes.
Belt-driven systems usually feel smoother than gear-driven options. They can suit home setups where noise and comfort are important. You still get force feedback, but the response generally isn’t as sharp or direct as a direct drive system.
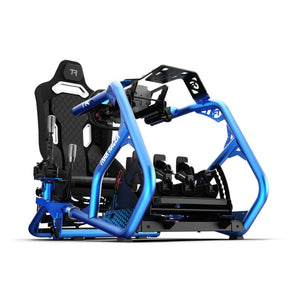
Direct drive systems give the most detailed feedback. From our showroom testing, direct drive setups make it easier to feel front-end grip, kerb strikes, rear-end movement and steering load. The trade-off is mounting. A powerful simulator wheel needs a stable cockpit. If the frame flexes, you’ll lose some of the detail the wheelbase is trying to send through your hands.
A simulator wheel should match your platform, cockpit, driving style and upgrade plans. Don’t choose by torque numbers alone. A higher-output wheelbase can feel poor if it’s mounted badly, configured incorrectly or connected to a weak pedal setup.
The first thing to check is platform compatibility. Some wheels are PC-only, some support Xbox, some support PlayStation and some require specific wheel rims or hubs for console use. If you’re not sure, check the product page carefully before buying. You can also browse our Xbox racing simulator and PlayStation racing simulator ranges if console compatibility is your starting point.
The next factor is mounting. Direct drive bases place more load on the cockpit than entry-level systems. If you’re moving into a stronger simulator wheel, you may also need a sturdier cockpit or wheel mount. A stable cockpit lets you feel more detail and keeps the driving position consistent.
You should also check wheel rotation, rim size, quick release design, software control, pedal support and shifter compatibility. These details affect how the setup feels every time you drive.
When we set up a simulator wheel in the showroom, we don’t just bolt it on and start driving. We work through a basic checklist to make sure the whole rig feels right.
First, we check the wheel height. Your shoulders should stay relaxed, and your elbows should have a natural bend when holding the rim. If the wheel is too high, you’ll fatigue faster. If it’s too low, your steering inputs can feel cramped.
Next, we check seat distance. You should be able to turn the wheel without pulling your back away from the seat. Your legs should also reach the pedals without locking out at full brake pressure.
Then we check pedal angle and brake force. A simulator wheel can feel excellent, but if your pedals are too far away or the brake is too stiff for your seating position, your lap consistency will suffer. For many drivers, pedal adjustment makes the biggest difference after the wheelbase is mounted correctly.
Finally, we check cables, power access and software recognition. A clean setup reduces connection issues and stops cables from catching under the pedals.
For cockpits and add-ons, link through to racing simulator cockpits and racing simulator accessories so customers can plan the full setup, not just the wheelbase.
Start by unpacking every part carefully and checking it against the manual. Keep the screws, clamps, cables and power supply together until the wheelbase is mounted. Missing one small part can slow the whole setup down.
Mount the wheelbase to your cockpit or desk mount using the correct hardware. Tighten it evenly and check for movement before connecting power. If the mount shifts when you steer, fix that first. Software changes won’t solve physical movement in the rig.
Connect the pedals, shifter and handbrake to the correct ports. Some accessories connect through the wheelbase, while others connect directly to the PC. Follow the manufacturer’s instructions and avoid guessing, as incorrect connections can cause detection issues.
Once everything is connected, install the manufacturer software. Use the official website, download the latest version and check for firmware updates. After updates are complete, restart the system before opening your game.
Then run the calibration process. Centre the wheel, set the rotation range, test each pedal input and save your profile. If the simulator wheel isn’t centred in-game, return to the software and recalibrate before adjusting game settings.
The best settings depend on the wheelbase, game and car, but our team usually checks the same areas first.
Wheel rotation is the starting point. Road cars and GT cars often feel better with a wider rotation range, while formula-style cars usually use a lower range. The key is matching the hardware setting with the in-game setting, so the wheel on screen follows your real input.
Force feedback strength comes next. Too much force can cause clipping, where the game can’t send extra detail through the wheel because the signal is already maxed out. Too little force can make the car feel vague. We usually start with a moderate setting, then increase or reduce it based on kerb feel, steering weight and tyre slip.
Dead zones should be kept low unless the wheel or pedals are giving false input. If your wheel has a dead zone, small steering corrections can feel delayed. If your pedals have a dead zone, throttle and brake control can feel inconsistent.
For a more complete setup, browse sim racing shifters and sim racing handbrakes. A balanced setup gives you better control than a powerful simulator wheel connected to weak pedals.
Force feedback is one of the biggest reasons drivers upgrade their simulator wheel. It’s the part of the system that tells your hands what the car is doing.
In our testing, the best setups don’t always use the highest force setting. A heavy wheel can feel impressive at first, but it can also hide smaller details and make longer sessions tiring. A well-adjusted setup should let you feel kerbs, understeer, traction loss and steering load without needing to fight the wheel every lap.
If the simulator wheel feels too aggressive, reduce overall strength first. Then check road effects, kerb vibration and damping. If the wheel feels too light, increase force gradually and test it over multiple laps. Don’t judge the setting from one corner.
The cockpit also changes the result. A rigid cockpit makes force feedback feel sharper. A flexible mount can absorb detail and make the same wheelbase feel weaker. That’s why we recommend checking cockpit stability before blaming the wheelbase.
Your pedals have a major effect on how your simulator wheel feels. If your braking is inconsistent, your steering will feel inconsistent too. You’ll turn in at different speeds, miss apexes and fight the car on corner exit.
Set your pedals so your feet land naturally on the throttle and brake. You shouldn’t need to stretch to reach full throttle, and you shouldn’t need to push your body back into the seat to reach full brake pressure. If you’re using load cell pedals, adjust the brake force to suit your seating position and leg strength.
A shifter or handbrake should be close enough to reach without twisting your torso. This is especially important for rally, drift and truck simulator setups. If you’re adding accessories later, make sure your cockpit has enough mounting points before you buy.
Internal links to load cell pedals, MOZA shifters and sim racing accessories can guide customers into the right supporting gear.
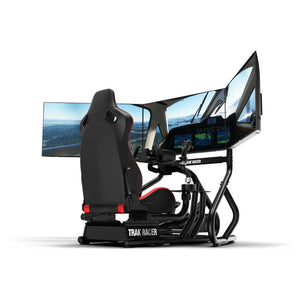
A simulator wheel setup feels more natural when your screen position matches your seating position. The monitor should be centred with your wheel and placed at a comfortable eye level. If you’re using a single screen, bring it as close as your rig allows without blocking steering movement.
Triple monitors and ultrawide screens can create a wider view, but they still need correct field of view settings. If your FOV is too wide, corners can look distorted. If it’s too narrow, speed and distance can feel off.
When we test rigs in the showroom, we always check the full driving position together: seat, wheel, pedals and screen. Changing one part often means another part needs adjusting. A good simulator wheel setup should feel natural before the car leaves pit lane.
A simulator wheel doesn’t need complicated maintenance, but regular checks can prevent small issues from turning into frustrating faults.
Wipe down the rim, pedals and cockpit after use. Dust, sweat and debris can build up around buttons, pedal pivots and mounting points. Check bolts every few weeks, especially on direct drive setups, as force feedback can loosen hardware over time.
Keep cables away from pedal movement and sharp frame edges. A cable that rubs under the pedals can eventually fail or cause dropouts. Leave enough slack for adjustment, but not so much that cables hang near your feet.
Update firmware only through the official software and avoid disconnecting power during the process. After any firmware update, recalibrate your simulator wheel before racing again.
You don’t always need to replace everything at once. In many setups, the best upgrade path starts with the weakest part of the rig.
If your wheelbase feels vague and you want more detail through the steering, moving to direct drive can make a clear difference. If your braking is inconsistent, pedals may be the better first upgrade. If your cockpit moves under force feedback or braking, the frame should be addressed before adding more power.
For entry-level drivers, a reliable wheel and pedal set is enough to start building skill. For committed sim racers, a direct drive base, load cell pedals and a rigid cockpit create a more controlled setup.
Use direct drive wheelbases, sim racing cockpits and sim racing pedal sets as internal links to support customers who are comparing upgrade paths.
A simulator wheel is only as good as the setup around it. The wheelbase, cockpit, pedals, software and screen position all need to work together. When one part is off, the whole rig can feel harder to control.
Our team has tested simulator wheel setups in our Dandenong South showroom and helped customers through the same decisions covered in this guide. The biggest lesson is simple: start with compatibility, mount the wheelbase securely, calibrate it correctly and adjust the settings based on real driving feel.
If you’re building your first rig or upgrading an older setup, start with the simulator wheel collection, then match it with the right cockpit, pedals and accessories for your space, platform and driving goals.
This guide was reviewed by the Gamer Gear Direct simulator team in Dandenong South. Our team works with simulator wheels, racing cockpits, pedals, shifters and accessories across showroom testing, customer setup support and product advice.


